Learning Material
Setting up presentations in R Studio
When producing presentations in R, one of the most common setups is through Rmarkdown. Rmarkdown is a notebook interface, similar to Observable or Jupyter. And is able to integrate multiple programming language formats together to produce both static and dynamic outputs, including HTML, PDFs as well as Websites and articles.
Getting Started
Before you can open, and setup, your first presentation, you must install and load the CRAN package Rmarkdown. Although we will only use a limited number of functions directly from this package, this provides the infrastructure required in R Studio in order to open and setup presentations.
To install ‘Rmarkdown’ run the following:
install.packages("rmarkdown")
library(rmarkdown)
Please note, it is advised you do not restart R prior to installing the package, as it will otherwise loop the same error message! If you don’t get this message, don’t panic!
Once installed, restart your R Studio. This will unlock access to additional addins and procedures required for this session.
Once restarted, open an empty project file, and access: File -> New File -> R Markdown.
This will open up the following window and select Presentation.
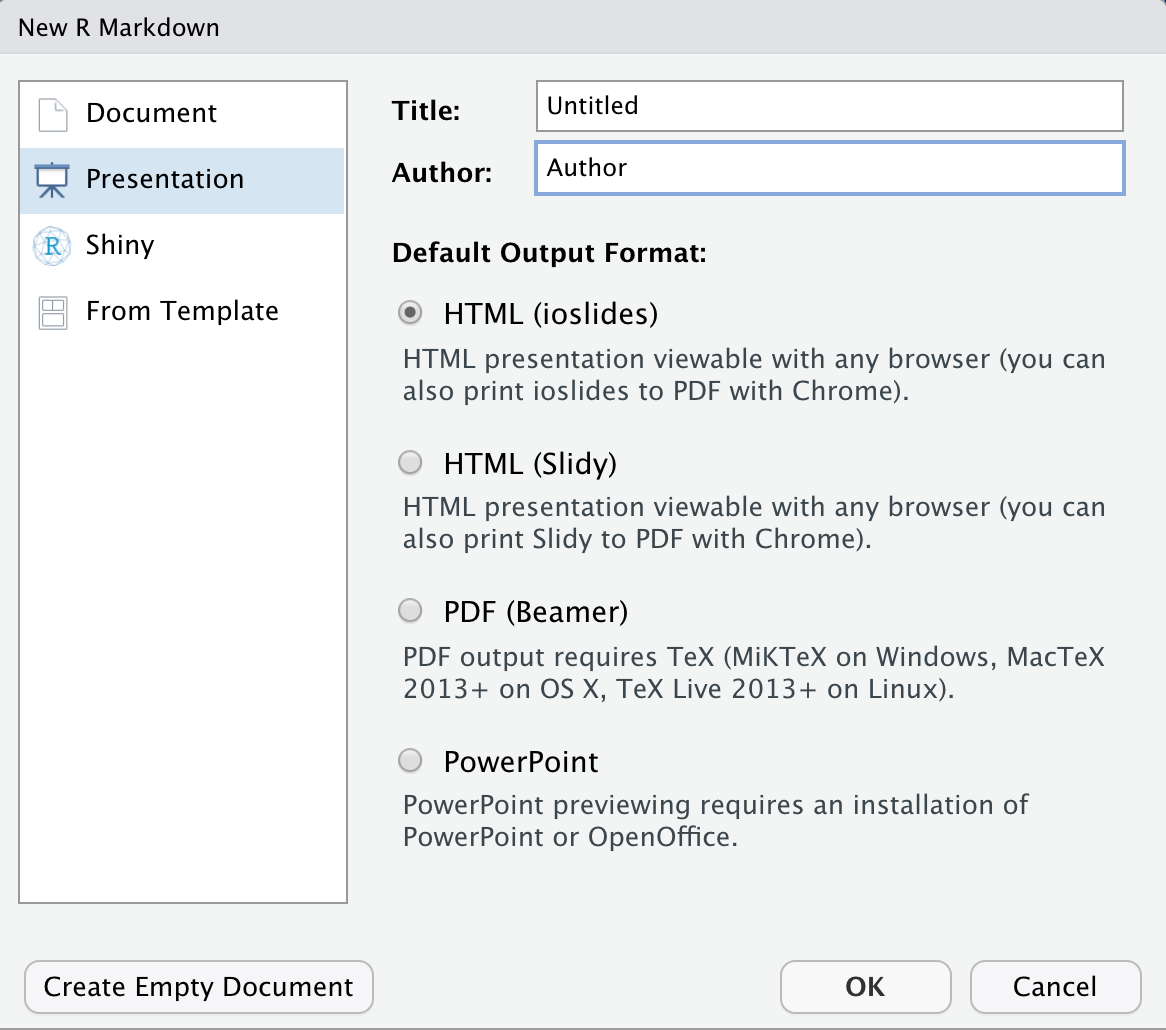
The options presented demonstrate the multiple different output methods can be had with presentations. For the purpose of today’s session we will largely discuss ioslides, with some mention also of beamer, as these are two of the more frequently used methods.
If you select OK rather than Create Empty Document this will generate a demonstrative presentation in your selected default output format.
As we will be working with Beamer also, ensure you have also downloaded the relevant TeX program (if possible). For Windows here, for Macs here, or Linux here.
Knitting your first presentation
Before we dive deeper into the syntax and in depth elements of these procedures, ensure you can save and knit your presentation successfully. For this select the Knit button, specify the location to save. This should produce a pop-out window, containing the HTML file of your presentation.
At this point, if you are simply setting up your R Studio for our live session, you can stop here. However if you are completing this independently we will dive further into the finer points of R Markdown Presentations.
Standard R markdown Syntax for Presentations
As a document compiler, R markdown is underwritten by the language LaTeX and through TeX allows the production of files. In mainstream academia, LaTeX processers are incredibly common, due to its free nature, as well as flexibility across the publication of scientific documents.
Since R markdown is underwritten by LaTeX and compiled through TeX, there is a large amount of syntax which can be used between different R markdown document types (presentations, reports and websites). However, there is also syntax specific for presentations. We will first cover the syntax specific for presentations, before covering some useful universal syntax. A summary of this syntax can be found under Cheat sheets & Helpful Guides.
Presentation Structure
A presentation in R markdown has a specific structure, based upon core syntax. The structure of a presentation can be defined into three sections:
- The header, defined between
---, defining main parameters - Heading Slides, defined after
# - Normal Slides, defined after
##
The Header: Presentation Metadata
The header in an R markdown presentation, defines the YAML metadata, such as outlining the:
- title
- author
- date
- output
After defining the output of the R markdown document, several sub-parameters can also be defined:
- Display bullet points with incremental: true
- Presentation size with widescreen: true
- Text size with smaller: true or larger: true
- Transition Speed with transition: and either default, slower, faster
- Adding a logo, logo:
Heading Slides
Heading slides, define the beginning of sections or sub-section. And is defined through text following a single #. Any text which comes in the section following this will be seen as super text, at the top of the slide.
Normal Slides
Regular or Normal slides are defined by dual ##. The title of the slide is defined by text following this. With the content of the slide being defined in the text after.
Within normal slides, you can insert and use
- Bullet Points, using
- - Block quotes, using
> - - Output, Script & Visualizations (see below)
Any combination of Heading Slides & Normal Slides can be used to create your desired presentation.
Printing Code, Script and Visualisations in Presentations
In a normal slide, it is possible to either display code, provide results or data visualizations with relative ease. Since R markdown, similar to other notebooks, uses code chunks to contain their code.
Within R markdown, code chunks delimiters are written as such:

These code chunks act in the same way as regular code script. But can be customized with the knitr options, with the arguments set within the { }. Typically, there are five commonly used arguments (although more exist).
- include = FALSE - prevents code and results from appearing in the finished file, code is still run.
- echo = FALSE - prevents code, but not results from appearing in the finished file.
- message = FALSE - prevents messages, generated by code from appearing in the finished file.
- warning = FALSE - prevents warnings, generated by code from appearing in the finished file.
- fig.cap = “…” - adds a caption to a graphical result.
- fig.height = … - Defines figure height.
- fig.width = … - Defines figure width.
When using these code chunks within your presentation, to display data visualizations, it is important to use a combination. Most typically, this includes: echo = FALSE, message = FALSE, warning = FALSE in addition to figure parameters.
Pre-built presentation themes
Although ioslide is a common presentation setup, beamer is an alternative setup. The benefit of beamer, is the large range of pre-built colour, layout and font themes. The full pre-built theme gallery can be viewed here, or here
To change an ioslide presentation to a beamer presentation, edit the metadata output parameter from: ioslide_presentation to beamer_presentation. Then you can specify the theme as sub-parameters of the theme:, colortheme: and fonttheme:. Like so:
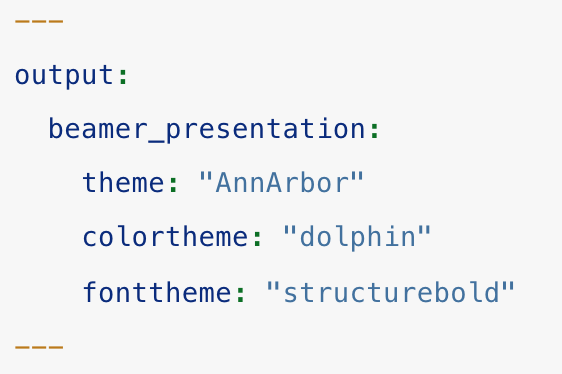
Beamer Example Meta Data
Taken from R Markdown: The Definitive Guide
Despite beamer being the main provider of pre-built themes, templates do exist for alternative ioslide, and are available online.
Although useful in that pre-built themes can save us time, I find personally that a plain presentation does the job just as well!
Exporting and using presentations
Exporting and using presentations, as discussed above, is completed through knitting the presentation via the Knitr package.
Presentations can be knit to various formats, HTML through ioslides & Slidy, PDF through Beamer and Powerpoint.
Once saved, these can then be used as regular presentation from your file directory.
Presenting Shortcuts
When presenting with ioslides, in HTML you can use the following keyboard shortcuts:
- f: enable fullscreen mode
- w: toggle widescreen mode
- o: enable overview mode
- h: enable code highlight mode
- p: show presenter notes
- esc: to exist any of the modes listed